

Key takeaways
- Choose a basic inductive timing light if you only need to verify initial timing on an older distributor engine. Choose the Innova 5568 or a comparable digital model if you regularly tune several engines and need dial-back advance, RPM, and clearer adjustment feedback. Whichever type…
The best timing lights for accurate ignition tuning are the Innova 5568 for an all-round digital tool, a basic inductive light such as the Actron CP7529 for budget checking, and an advanced dial-back light with a tachometer display for engines that require precise total-advance verification.
Our top picks
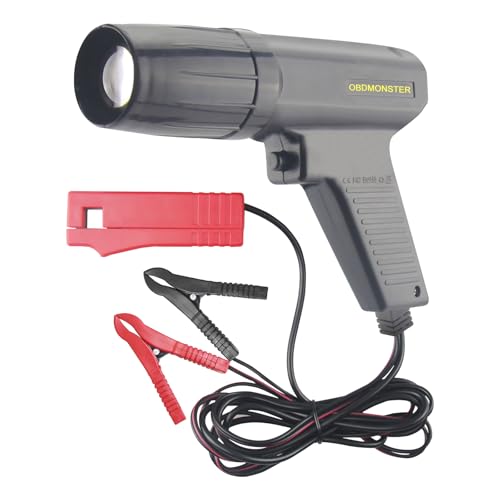


As an Amazon Associate we earn from qualifying purchases at no extra cost to you. Ratings are shown as listed on Amazon.
Best timing lights by situation
| Situation | Best choice | Why it fits | Typical market range |
|---|---|---|---|
| Occasional tune-ups on a conventional distributor engine | Basic inductive timing light | Simple controls, low cost, fewer settings to misread | $35–$70 |
| Frequent tuning across several engines | Innova 5568 or comparable digital advance light | Adjustable advance, tachometer, voltage display, and brighter xenon flash | $110–$180 |
| High-compression, high-RPM, or brightly lit engine bays | High-output digital timing light | Better flash visibility and a stable inductive pickup are more useful than extra accessories | $150–$300 |
| Older vehicle with limited battery access | 12-volt light with a 6-foot or longer lead set | Allows the tool to remain beside the timing marks while connected to a remote battery | $50–$180 |
What matters most when comparing timing lights
Flash brightness and timing-mark readability
A timing light is only accurate if you can see a sharply frozen mark. Xenon strobe lights remain common because they produce a short, intense flash that works well in daylight. LED timing lights can be efficient and durable, but brightness and optical focus vary widely between models.
Look for a focused beam, a large reflector or lens, and a trigger that does not require awkward hand positioning. A bright flash helps in sunlight, but excessive glare from painted or polished timing covers can make the mark harder to read. Mark the crank pulley with a narrow white paint line rather than coating the entire timing scale.
For routine garage work, brightness comparable to a conventional xenon unit is usually adequate. For outdoor tuning, choose a high-output model and shade the timing marks whenever possible. Do not infer accuracy from brightness alone: a brilliant flash with an intermittent pickup can still produce a misleading reading.
Advance functions: useful, but easy to misuse
A basic light shows the timing mark where it naturally appears. A dial-back light lets you enter an advance value, then rotates the strobe electronically so the specified mark can be aligned with zero. This is useful when the timing scale has only a top-dead-center mark or when you want to check total advance at higher RPM.
Dial-back control is not automatically appropriate for every ignition system. Some electronically controlled engines alter timing continuously, and certain multi-spark or coil-on-plug systems do not provide a conventional plug-wire signal. On a distributor engine, verify that the service procedure permits a timing-light adjustment and whether vacuum or electronic advance must be disconnected.
The best advance control has a positive knob or clearly readable buttons, a display that remains visible while the light is aimed at the pulley, and a range of at least 0–60 degrees. A timing light that displays 0.1-degree increments may look impressive, but engine movement, mark width, and pickup stability often limit practical precision to roughly one degree.
RPM displays and the value of a tachometer
An integrated tachometer saves a second instrument and makes total-advance checks repeatable. It is particularly helpful when the engine must be held at a specified speed, such as 2,500 or 3,000 RPM, while you observe the timing mark.
Do not treat the displayed RPM as laboratory-grade. The reading depends on the ignition signal, cylinder-count setting, and pickup quality. Confirm that the light supports the engine’s cylinder configuration, commonly 2-, 4-, 6-, and 8-cylinder settings. A display with large digits and a refresh rate that does not visibly flicker is more useful than a wider advertised RPM range.
Inductive pickup reliability
The inductive clamp is the component most likely to cause frustration. It senses the magnetic pulse from the No. 1 plug wire, so it must be oriented correctly and fully closed. An arrow or “plug” marking should point toward the spark plug end of the wire.
A good pickup produces a steady flash at idle and remains stable as RPM rises. Poor designs may flash erratically on small plug wires, high-resistance wires, or ignition systems with unusual signal characteristics. A detachable pickup lead is convenient if it can be replaced, but its connector becomes another possible failure point. A permanently attached lead is less modular but often simpler for occasional users.
Before blaming the light, route the pickup away from the exhaust manifold and alternator, keep the clamp perpendicular to the wire, and avoid placing it over damaged insulation. If the flash skips, move the clamp to a straighter section of wire and inspect the plug lead for arcing.
Voltage compatibility and cord length
Most consumer timing lights are designed for 12-volt automotive electrical systems. That does not mean they are suitable for every vehicle. A 6-volt classic car may require a separate regulated power source or a model specifically rated for 6-volt operation. A 24-volt truck system should not be connected unless the manufacturer explicitly lists that voltage.
For normal work, a cable set of 5–6 feet is a practical minimum. A 7–8-foot set is easier to use on long engine bays or rear-mounted batteries, but extra cable adds weight and opportunities for the lead to contact moving parts. Check that the positive and negative clamps are insulated and that the leads remain flexible in cold weather.
Readability and control layout
Readability often matters more than a long feature list. A backlit digital screen is valuable in a dark workshop, while high-contrast printed labels are useful in daylight. The display should show advance and RPM without forcing you to move your eyes repeatedly between tiny indicators.
Prefer controls that can be operated with one hand. A trigger lock can help during extended checks, but a trigger that is too easy to activate may cause a flash when the tool is being repositioned. Rubberized housings improve grip, though they can become sticky with age when exposed to fuel vapor, oil, or heat.
Head-to-head: basic inductive light versus digital advance light
| Feature | Basic inductive light | Digital advance light |
|---|---|---|
| Typical weight | About 1.5–2.5 lb | About 2–3.5 lb |
| Power supply | Usually 12 V DC | Usually 12 V DC |
| Advance adjustment | None; reads the mark directly | Commonly 0–60 degrees |
| RPM display | Usually absent | Often included, with cylinder selection |
| Best use | Checking initial timing on a known timing scale | Verifying initial, centrifugal, and total advance |
| Common drawback | Less useful when marks are hidden or limited | More controls and more opportunity for an incorrect setting |
The Actron CP7529 is an example of the basic approach: an inductive, 12-volt light intended for conventional tune-up work. The Innova 5568 represents the more capable digital category, with advance and RPM functions suited to repeated distributor tuning. Availability and current specifications can vary, so confirm the model’s voltage rating and included pickup before purchase.
How to use a timing light without creating a false reading
- Warm the engine to its normal operating temperature. A cold idle can change both speed and timing.
- Set the engine to the manufacturer’s required idle speed and disconnect or disable vacuum advance only when the service instructions call for it.
- Connect the red and black power clamps to the correct battery terminals. Keep every lead clear of belts, fans, pulleys, and exhaust components.
- Clamp the pickup around the No. 1 plug wire with its directional arrow pointing toward the plug.
- Start with the advance control at zero. Confirm that the mark is stable before using dial-back functions.
- Illuminate the timing scale and compare the mark with the specified initial setting. If the mark wanders, stop and diagnose the pickup, ignition wire, or engine condition.
- For total-advance checking, increase RPM gradually, record the RPM at which timing stops advancing, and return the engine to idle before making adjustments.
For example, if the specification is 10 degrees before top dead center and the light is set to 10 degrees of dial-back, the pulley’s 10-degree mark should align with the zero pointer. If you accidentally leave the light set to 10 degrees and then read the 10-degree mark as though the light were at zero, the result can be 10 degrees wrong. Always reset the control before the next measurement.
Ownership, maintenance, and common failure points
The pickup clamp and cable usually wear before the lamp housing. Repeated bending near the handle can break internal conductors, while heat from the exhaust can harden insulation. Store the light with the cable loosely coiled rather than sharply wrapped around the body.
Clean the lens with a soft, slightly damp cloth. Do not use fuel, brake cleaner, or strong solvent on a rubberized housing or clear plastic lens. Inspect the battery clamps for corrosion and check that the inductive jaw closes completely. Replace damaged leads instead of taping them near hot or moving components.
Common mistakes include connecting the pickup backward, choosing the wrong cylinder setting, reading a mark that is not true top dead center, leaving vacuum advance connected when it should be disabled, and revving the engine without securing loose clothing and cables. A timing light can show ignition position; it cannot correct a slipped harmonic balancer, worn distributor drive, weak timing chain, or unstable idle.
Bottom line
Choose a basic inductive timing light if you only need to verify initial timing on an older distributor engine. Choose the Innova 5568 or a comparable digital model if you regularly tune several engines and need dial-back advance, RPM, and clearer adjustment feedback. Whichever type you buy, prioritize a stable pickup, a bright focused flash, correct voltage compatibility, at least a 5-foot cord, and controls that you can read while aiming at the timing marks.

Write Your Review
No reviews yet. Be the first to share your experience!